ISLAND GREEN WOODWORKING


Wednesday, March 17, 2010

Pine Shaker Clock - The Finish

I spray 2 to 3 light coats of General Finishes Vintage Cherry water-based dye stain, straight from the can. Once the dye has dried, I begin by wiping the General Finishes water-based Shaker Maple stain over the dyed surface. Should the stain not take to your surface evenly, use paper towels damp with water and wipe the surface to pull the excess stain off. This is probably just a good idea anyway, for even color.


Now to the cool part, this allows you to achieve deeper color. First, I shoot a water-based topcoat over the dry Shaker Maple stain. In this case, I'm using the EM6000 production lacquer from Target Coatings and that will amber a bit like solvent nitro lacquer. Second, once the lacquer has dried, I lightly wipe with 320 paper and clean my surface. Then I glaze with the same Shaker Maple stain. So now we have stacked our color, which give's depth to your project and by the same token, will aid to even your color as well.

Once the stain has dried I shoot 2 coats about 2/3 mils thick (the point where your wet film finish starts to look blue) and call it done.


Monday, March 1, 2010

Tiger Maple Shaker Clock

Tiger maple clock completed. My topcoat is the new General Finishes water based lacquer. Sprayed really nice, laid down flat and smooth.


Sunday, February 7, 2010

Tiger Maple Shaker Clock

Building a Shaker inspired clock from hard Tiger Maple , together with, one of pine, (top left). The case is rabbit joint construction, wood is 9/16 thick. I purchased the Tiger Maple from my friend Bob Kloes Bob has the most gorgeous maples I have ever seen, never has he let me down. Ummm, the pine, well that's just box store special.


Took a lot of flipping and flopping to get the grain and curl going the way I wanted. Rail and stile construction using the mini rail and stile bits from MLCS Woodworking.


I struggled with the door panel. It was milled from a single wide board and had cupped a good deal. I thought I could win the battle by placing the board in traction by wetting with water, then over bending and apply heat and steam. But once the board became acclimated, it bent right back. Enough time was being wasted. So I just wet the cup side, as soon as the wood relaxed, I began working the panel to final size then locked it into the rail & stile frame. So far so good.

Thursday, September 10, 2009

Learn To Turn Part 3

Respect your Elders (Acer Negundo) Box Elder Silly!

I had e-mailed Kevin and his Wife Terry at Powder Creek Sawmill, my goal, to take my turning up a notch! Sink my teeth into some of that beautiful Flame Box Elder. My expectation was a bowl between six to eight inches in diameter and two inches in height. Within a few days my little bundle of joy arrived.


Never before have I seen Box Elder up close and in person. I didn’t know what to expect. So down to the shop I go, draw my outline of a circle and band saw out (this step save you time on the lathe rounding your stock). Let me tell you something, put a piece of Flame Box in the lathe, see what happens to your heart rate. You pay attention brotha, you feel like your ready to play a fine musical instrument with thousands of people watching you. I have read how prized Flame Box Elder is to the turning junkies, trust me I’m about to find out why!


After roughing the blank out. I was amazed what I saw. Interesting pattern’s colors, even two insect holes. I wasn't expecting the finest qualities that nature had to offer. Think about it, I have spalt, curl and red flame all in one small block. So for about $30.00 will fetch you a nice piece like this.


Sprayed with a weak dye (a couple drops of Trans Tint Honey Amber to a full coffee cup of lacquer thinner, could use alcohol, however, lacquer thinner will dry quicker).


With the dye completely dry, I oiled the dye in with General Finishes Seal-A-Cell. A light scuff with 320 foam-backed paper to the dry oiled surface then I shoot one coat of a two pound cut of blond de-waxed shellac, locks everything down and readies the surface for the water based topcoat.

Scuff the dry shellac with 320 foam-backed paper, then apply five topcoats by hand using a cotton rag with General Finishes water-based High Performance Satin. Make sure to scuff with 320 between each coat. Once the topcoat has thoroughly cured. I rubbed out the bowl with a 2000 grit Abralon pad and finish off with a coat of wax.

Sunday, August 16, 2009

Learn To Turn Part 2

Like a moth to a light, I chucked up the bad boy! Went right for the good stuff. The turtle shell looking burl Maple! I made no plan, didn’t have a clue as to form. I’m a lathe turning artist by golly. Simply going to let things happen.

Safety First, I had asked around about turning “wild” type wood. I’ve heard, especially with the spalted woods, you need to be careful about the dust containing molds. Eye and sinus infections could result. So for me, on with a good respirator and eye protection.
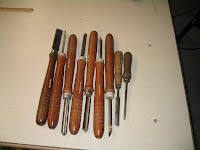
I don’t have the high flautin bowl gouges the “real” turners do. Perhaps if the turning bug bites me hard, some day I’ll join that club. But I do have a set of “Sears Craftsman value pack turner specials” sitting on my bench. And since my chisels look every bit like they were dragged behind a car, (perhaps that is why our previous owner put an eyehook into each chisel handle,) needed sharpening.
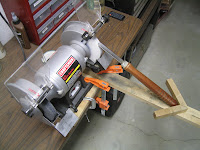

Ok with sharp chisels, were ready to go! Things were going great till a few chunks came flying off, harmless though. Cut into a few soft spots. More worm/insect tunnels to cut through, but ultimately, arriving to a nice cylinder shape, smaller than I was hoping for, but doggoned, I had something to work with.


My Weed Vase, sanded smooth and 5 coats of General Finishes SEAL-A-CELL Clear. The Maple burl really drank in the oil, so basically keep coating till it won’t take any more.

Thursday, August 13, 2009

Learn To Turn - Part 1

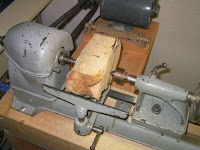
Let me introduce to you, my lathe. It’s a 79-year-old Power King 9” lathe. I paid 150.00 off a Craigslist seller, included with the lathe, a new Rockler brand duplicator (not pictured). My intent was not to turn bowls or vases. Strictly, for cleaning up table legs on refinishing work.


So I sent my friend and fellow woodworker Bob Kloes, ("Bob") that lives in Wisconsin, who by the way sells some of the most beautiful figured woods you will ever see, an e-mail if he knew of someone selling turning blanks. So Bob knows a guy and asked what I was looking for? My comment to Bob “I have no clue!” Bob said not to worry and got working on it. Well look what showed up at my doorstep. I have from left to right 1 Maple blank and 2-burl Maple blanks.

Folks the only thing I have ever turned on my lathe was a pine 2x4 just messing around with coves and beads, that’s it! Oh great…go from the frying pan into the fire. I have three (3) beautiful chunks of wood, and one looks like a turtles shell or a compressed heap of knurled tree, (which I think is the really special one).

Tuesday, July 14, 2009

Heavy Duty Stress In Wood

While ripping cedar boards yesterday I encountered heavy-duty wood stress. So much so, the board pinched between the table saw fence blade and splitter enough that I couldn't advance my 8’ board through the cut. Notice the gap under the board resting on the saw top. You should have seen the 1”x 1” strip that I was attempting to cut. It came off the blade “C” shaped and twisted from the wood tension.

Safety First

If this happens to you immediately stop feeding the board hold your board firmly in place, shut the saw down remove the board when blade stops spinning.

