ISLAND GREEN WOODWORKING


Thursday, September 10, 2009

Learn To Turn Part 3

Respect your Elders (Acer Negundo) Box Elder Silly!

I had e-mailed Kevin and his Wife Terry at Powder Creek Sawmill, my goal, to take my turning up a notch! Sink my teeth into some of that beautiful Flame Box Elder. My expectation was a bowl between six to eight inches in diameter and two inches in height. Within a few days my little bundle of joy arrived.


Never before have I seen Box Elder up close and in person. I didn’t know what to expect. So down to the shop I go, draw my outline of a circle and band saw out (this step save you time on the lathe rounding your stock). Let me tell you something, put a piece of Flame Box in the lathe, see what happens to your heart rate. You pay attention brotha, you feel like your ready to play a fine musical instrument with thousands of people watching you. I have read how prized Flame Box Elder is to the turning junkies, trust me I’m about to find out why!


After roughing the blank out. I was amazed what I saw. Interesting pattern’s colors, even two insect holes. I wasn't expecting the finest qualities that nature had to offer. Think about it, I have spalt, curl and red flame all in one small block. So for about $30.00 will fetch you a nice piece like this.


Sprayed with a weak dye (a couple drops of Trans Tint Honey Amber to a full coffee cup of lacquer thinner, could use alcohol, however, lacquer thinner will dry quicker).


With the dye completely dry, I oiled the dye in with General Finishes Seal-A-Cell. A light scuff with 320 foam-backed paper to the dry oiled surface then I shoot one coat of a two pound cut of blond de-waxed shellac, locks everything down and readies the surface for the water based topcoat.

Scuff the dry shellac with 320 foam-backed paper, then apply five topcoats by hand using a cotton rag with General Finishes water-based High Performance Satin. Make sure to scuff with 320 between each coat. Once the topcoat has thoroughly cured. I rubbed out the bowl with a 2000 grit Abralon pad and finish off with a coat of wax.
Sunday, August 16, 2009

Learn To Turn Part 2

Like a moth to a light, I chucked up the bad boy! Went right for the good stuff. The turtle shell looking burl Maple! I made no plan, didn’t have a clue as to form. I’m a lathe turning artist by golly. Simply going to let things happen.

Safety First, I had asked around about turning “wild” type wood. I’ve heard, especially with the spalted woods, you need to be careful about the dust containing molds. Eye and sinus infections could result. So for me, on with a good respirator and eye protection.

I don’t have the high flautin bowl gouges the “real” turners do. Perhaps if the turning bug bites me hard, some day I’ll join that club. But I do have a set of “Sears Craftsman value pack turner specials” sitting on my bench. And since my chisels look every bit like they were dragged behind a car, (perhaps that is why our previous owner put an eyehook into each chisel handle,) needed sharpening.


Ok with sharp chisels, were ready to go! Things were going great till a few chunks came flying off, harmless though. Cut into a few soft spots. More worm/insect tunnels to cut through, but ultimately, arriving to a nice cylinder shape, smaller than I was hoping for, but doggoned, I had something to work with.


My Weed Vase, sanded smooth and 5 coats of General Finishes SEAL-A-CELL Clear. The Maple burl really drank in the oil, so basically keep coating till it won’t take any more.

Thursday, August 13, 2009

Learn To Turn - Part 1

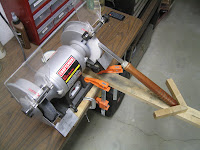
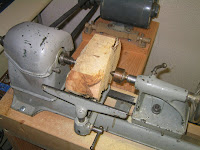
Let me introduce to you, my lathe. It’s a 79-year-old Power King 9” lathe. I paid 150.00 off a Craigslist seller, included with the lathe, a new Rockler brand duplicator (not pictured). My intent was not to turn bowls or vases. Strictly, for cleaning up table legs on refinishing work.


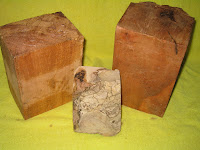
So I sent my friend and fellow woodworker Bob Kloes, ("Bob") that lives in Wisconsin, who by the way sells some of the most beautiful figured woods you will ever see, an e-mail if he knew of someone selling turning blanks. So Bob knows a guy and asked what I was looking for? My comment to Bob “I have no clue!” Bob said not to worry and got working on it. Well look what showed up at my doorstep. I have from left to right 1 Maple blank and 2-burl Maple blanks.

Folks the only thing I have ever turned on my lathe was a pine 2x4 just messing around with coves and beads, that’s it! Oh great…go from the frying pan into the fire. I have three (3) beautiful chunks of wood, and one looks like a turtles shell or a compressed heap of knurled tree, (which I think is the really special one).

Tuesday, July 14, 2009

Heavy Duty Stress In Wood

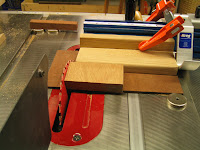
While ripping cedar boards yesterday I encountered heavy-duty wood stress. So much so, the board pinched between the table saw fence blade and splitter enough that I couldn't advance my 8’ board through the cut. Notice the gap under the board resting on the saw top. You should have seen the 1”x 1” strip that I was attempting to cut. It came off the blade “C” shaped and twisted from the wood tension.

Safety First

If this happens to you immediately stop feeding the board hold your board firmly in place, shut the saw down remove the board when blade stops spinning.

Saturday, June 20, 2009

MLCS Matched Miniature Rail & Stile Router Bits

The online Shaker Clock video over at Charles Neil Woodworking, Charles used the Eagle America/Price Cutter miniature “round” matched rail and stile bit set for the clock doors. As I write, the lower priced Price Cutter bit set is selling for $89.99 and not sure if the shipping is included?

So last week I was looking around on the Internet and found a Company called MLCS Woodworking. They sell router bits and other woodworking goodies and have the miniature “round” rail and stile matched bit set for $49.95 with free shipping so for you value seekers, that's a $40.00 savings.

Worked Great!

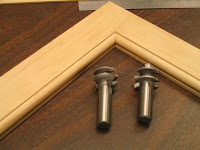
Found a little shop time, milled some pine to 9/16 and ran the MLCS Woodworking mini round rail and stile bits. It didn't take long to dial in the setup.
This joint is not glued only pushed together by hand.

Sunday, May 17, 2009

Kehoe Jig Sled Setup

Here’s where you begin to work a little, the cool part. Now I didn’t pay that close attention to Charles in the Kehoe video (but I should of... I wasted a lot of time here where to start the index) but he did say it. Notice the picture and note the alignment of the stop (the thing with magnet attached) the sled and your wood. That is key, its your index point, you should now be ready to make your cut.

Here you will be making multiple test cuts to adjust your spline fit. First, set your blade angle as Charles instructs in the video. This is blade angle on your saw in relation to the angle of your dovetail cut, meaning insuring a proper fitting spline.

Second is the width of the spline. Set this up as Charles instructs in the video. I made a test cut using the pencil line which resulted in too wide of a spline. Note how I have moved away from my pencil line on the sled, this allows for a narrower spline. My goal is to have the spline centered in the dovetail cut.

Here the sled is through its full rang of motion. The sled must stop at the magnet or you will cut through the sled base! Cut and test cut and test!


Saturday, May 16, 2009

Kehoe Jig Adjusting The Cut

Oops, the first cut is too deep which causes the top portion of the cut to tear out from the rotating shank passing through the wood instead of the cutter surface. Too deep because I adjusted my router so the dovetail bearing was tracking or following dead center along the finger or slot of the jig.

My second cut (one on the right) was set with the bearing riding high enough on the finger (about half the bearing) with the top of the cutter just kissing or passing through the top of the cut. Just perfect! My pencil line is to help with the visual and not an aid for cutting or set up. Nothing difficult here at all.

Thursday, May 14, 2009

The Kehoe Jig For Making Spline Dovetails

In December 2008 the Kehoe Master Jig was a Charles Neil Contest prize which I was fortunate to win. Recently I had time to learn the basic jig. Before doing so, I suggest you watch the Charles Neil demonstration video first and along with the directions supplied with your jig.

I’m telling you this jig is super easy! Even easier if you already have experience machine cutting dovetails. The spline setup on the table saw was the most time consuming. But I would expect under an hour is probably about average for a first time . Next time I bet my setup should take less than 10 minuets. It’s the getting use to it part and test cuts making sure of a perfect fit.

Frankly, the supplied splines used as a gauge will get you as close to your fit as possible like Charles describes in the video. The two (2) setup cuts most time consuming will be table saw blade angle, necessary for a tight fit without gaps. The other is width of cut so splines center within the grove of your dovetail.

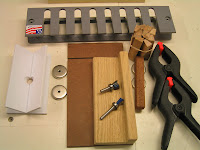
Kehoe Jig in position. If you have additional spring clamps in the shop, use them. I have four (4) holding the Jig down. Rather have a wee bit more holding power.

Tuesday, April 7, 2009

Speed Up Re-Coats Of Shellac

So you just sprayed an awful looking first coat of shellac, orange peel you name it! You put down too heavy a coat. You don't have all day to wait for the shellac to completely dry and you want to get another coat on to build your topcoat. However, first, you will need to knock down high spots of orange peel to level out your surface before a re-coat.

Ok we all know the rule, a topcoat is dry when sanded, a white powder comes off the paper, (in this case I'm using amber shellac so it will be an amber color powder). Now my shellac only has about an hour of dry, my sandpaper is still digging into the shellac and loading up. The shellac is dry, just not dry enough to "dry sand."

Solution, I know this sounds crazy, wet sand with soapy water. The soap provides lubrication. In this case, I'm using a foam backed 320 grit wet/dry sandpaper from Mirka. Great for scuffing between topcoats. The foam backing helps keep even "light" pressure that can actually help you from sand-thru. The bonus is the papers wet/dry performance!

Tuesday, March 24, 2009

Refinishing In Shellac A Veneer Table

Working on refinishing a teak/veneer coffee table that a friend purchase many years ago in the discount section. I suspected the veneer just de-laminated. However working on the table it was apparent while heating (after stripping the finish off cover the spot with thin cardboard and use medium heat from a household iron to warm the spot, this sometimes reactivates the glue) it wouldn't stick down. So I took a razor blade and slit into 2 of the bubbles and hit it with more heat then while pressing with my finger I could definitely feel something firm. Obviously, some crud must of been trapped underneath the veneer from the factory. The dents and deep scratches have been removed with a hot steam iron along with the alcohol water trick. I think our friends are going to be very surprised. Because of the thin veneer, I didn't want to take a chance of sanding through with my random orbit sander ("ROS") so I block sanded with 220 by hand instead.

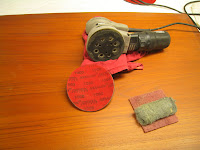
Last week, one day our weather hit in the 60's (did you know... shellac isn't temperature sensitive and cold weather even under 40 won't affect the cure, that's a good thing to know way up here in the cold North), so I set up the garage to spray. I used the Zinsser Bulls Eye Amber Shellac 3 pound cut straight from the can (don't forget to strain your shellac it does contain lots of junk,chunks even bug parts) and put down a heavy coat or two. Sanded back with 320, then I decided to have some fun and hooked on to my ROS the Mirka Abralon 1000 and 2000 grit sanding pads to figure out my sheen. Wet the table top with soapy water and WOO HOO. No I didn't electrocute myself, but don't you do that, water and electricity DON'T MIX. Do not use an electric sander for this operation.

I want to achieve a satin finish and get that "close to the wood" feel as possible. I didn't really pile on that much shellac. Just enough to rub. So first, it's necessary to remove the gloss from the grain pockets to match the satin sheen of the higher top surface. To do this, I used 00 steel wool (didn't have any 0000 steel wool) and scrubbed (not hard) in the direction of the grain, then went over the entire top with maroon scuff pad.


Using the 1000 grit Abralon pad will give you approximately satin sheen. Using soapy water as a lubricant, hit it ACE! I Keep the ROS (sander) moving using light pressure (the weight of the sander is all that is necessary)


All done! It's that simple and looks great as is. But! I went ahead and put a coat of wax on to shine things up just a wee little bit....It's so easy guys and gals...you just can't mess up with the Abralon pads. Try them they work great, just as easy using by hand.